Documentation
Tutorial
- Introduction
Blog
- Setup The Requirements
- Create Required Schemas
- Create Content Entries
Vanilla JavaScript App
React App
Front-end
Your First Extension
Table Of Contents
Aventum separated into two apps, a client-side app running in the browser which is the dashboard, it is a react app bootstrapped using Create React App, and a server app created using Express, you can create extensions for the backend(the express server) and the frontend(the dashboard) app.
Clint Side/Dashboard Extension
Extension source code available here https://github.com/TryAventum/sample-dashboard-extension
Extension final build available here https://github.com/TryAventum/sample-dashboard-extension-final-build
Please notice that if you want to create a zip file from https://github.com/TryAventum/sample-dashboard-extension-final-build or after running
npm run buildin https://github.com/TryAventum/sample-dashboard-extension and taking thesample-dashboard-extensionfolder, thesample-dashboard-extensionfolder must be inside@aventumfolder and you must create a zip from@aventumfolder, like Sample Dashboard Extension Archive because the extension name is@aventum/sample-dashboard-extensioninsample-dashboard-extension/package.jsonfile.
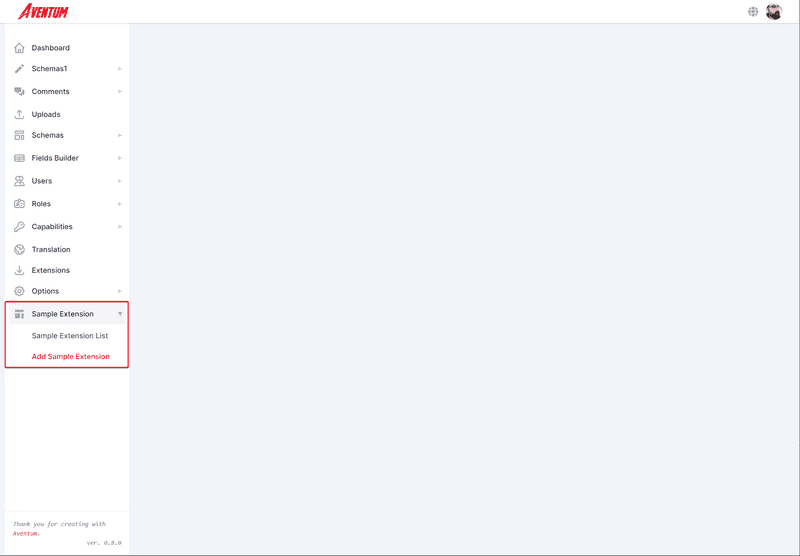
We will build an extension that adds an entry with tow sub-items to the sidebar.
Even if our extension is really simple we are going to show you how to create your extension using webpack, create a folder, and run npm init -y within it.
Install the following development dependencies that will be used to bundle our extension:
npm install -D @babel/core@^7.5.5 @babel/preset-env@^7.5.5 @babel/preset-react@^7.0.0 babel-core@^6.26.3 babel-loader@^8.0.6 babel-preset-env@^1.7.0 babel-preset-react@^6.24.1 webpack@^4.36.1 webpack-cli@^3.3.6Next, install our extension dependencies
npm install react@^16.8.6 react-dom@^16.8.6 react-router-dom@^5.0.1 semantic-ui-react@^0.87.3Replace the scripts section of package.json file with:
"scripts": { "build": "webpack" },Next, create src folder with index.js file within it and sample-dashboard-extension with package.json file within it.
In the sample-dashboard-extension/package.json put the following:
{ "name": "sample-dashboard-extension", "version": "1.0.0", "description": "Example of Aventum dashboard extension.", "main": "index.js", "author": { "name": "YOUR NAME", "email": "YOUR_EMAIL", "url": "YOUR WEBSITE" }, "repository": { "type": "git", "url": "https://github.com/YOUR_USER_NAME/YOUR_REPO" }, "license": "MIT", "aventum": { "target": "dashboard" }, "keywords": ["aventum", "aventum-extension", "aventum-dashboard-extension"]}The most important key in sample-dashboard-extension/package.json is aventum, we specified that this extension is a dashboard extension by using "target": "dashboard".
Next create webpack.config.js file with the following:
const path = require("path")const webpack = require("webpack")const version = process.env.VERSION || require("./sample-dashboard-extension/package.json").versionconst banner = "Aventum Sample Dashboard Extension v" + version + "\n" + "(c) " + new Date().getFullYear() + " YOUR_NAME\n" + "Released under the MIT License."module.exports = { entry: "./src/index.js", mode: "production", output: { path: path.resolve(__dirname, "sample-dashboard-extension"), filename: "index.js", library: "AventumSampleDashboardExtension", libraryTarget: "umd", }, externals: { react: { commonjs: "react", commonjs2: "react", amd: "react", root: "React", }, "semantic-ui-react": { commonjs2: "semantic-ui-react", commonjs: "semantic-ui-react", amd: "semantic-ui-react", root: ["aventum", "ui"], }, "react-router-dom": { commonjs: "react-router-dom", commonjs2: "react-router-dom", amd: "react-router-dom", root: ["aventum", "router"], }, }, module: { rules: [ { test: /\.m?js$/, exclude: /(node_modules|bower_components)/, use: { loader: "babel-loader", options: { presets: ["@babel/env", "@babel/react"], }, }, }, ], }, plugins: [ new webpack.BannerPlugin({ banner, }), ],}It is a webpack stuff so we will not discuss it here, however, we simply will take our source code from src/index.js compile it and put the output in the sample-dashboard-extension/index.js file.
In src/index.js put the following:
aventum.hooks.addFilter( "SideBarMenu", "Aventum/AventumSampleDashboardExtension/addMenuItems", (menu, $this) => { menu.push({ icon: '<svg fill="currentColor" viewBox="0 0 20 20"><path d="M3 4a1 1 0 011-1h12a1 1 0 011 1v2a1 1 0 01-1 1H4a1 1 0 01-1-1V4zM3 10a1 1 0 011-1h6a1 1 0 011 1v6a1 1 0 01-1 1H4a1 1 0 01-1-1v-6zM14 9a1 1 0 00-1 1v6a1 1 0 001 1h2a1 1 0 001-1v-6a1 1 0 00-1-1h-2z"></path></svg>', title: "Sample Extension", items: [ { name: "sampleExtensionList", title: "Sample Extension List", link: `/sample-extension/list`, }, { name: "newSampleExtension", title: "Add Sample Extension", link: `/sample-extension/new`, }, ], }) return menu })We use the SideBarMenu filter to modify the sidebar menu array and push a new item to it, then we return it.
Finally, run npm run build, your extension is ready now, you can now create zip file from the sample-dashboard-extension folder and upload it to Aventum.
Server Extension
Extension source code available here https://github.com/TryAventum/sample-server-extension
Our extension will simply print From Server ${uuid} to the server console.
Create sample-server-extension folder for your extension and run npm init -y within it.
Install our dependency:
npm install uuid@^3.3.2Add aventum key to the package.json file as follows:
"aventum": { "target": "server"}Your package.json file should look something like:
{ "name": "sample-server-extension", "version": "1.0.0", "description": "", "main": "index.js", "scripts": { "test": "echo \"Error: no test specified\" && exit 1" }, "keywords": [], "author": "", "aventum": { "target": "server" }, "license": "ISC", "dependencies": { "uuid": "^3.3.2" }}Create index.js with the following:
const uuidv1 = require("uuid/v1")console.log("From Server ", uuidv1())Your extension is ready now, you can now create a zip file from the sample-server-extension folder and upload it to Aventum.

